Ready to wear, ready to go, ready to hang–as a curator, I’ve seen a variety of methods artists use to hang their work. HOWEVER, there are several artists who are so intent on creating their work, they forget it needs to be displayed as well.
There are a variety of surfaces artists work on, so we’ll tackle one per post. Here, we’ll focus on Works on Canvas, of which my gallery has a lot of dealings.
First thought for artists, ‘Canvas, easy to easy to hang!’ A frame, a wire, even the dreaded saw-tooth hanger can be used, depending on the size of the canvas. The larger the piece, the larger the tools to hang it. Use a heavier wire for larger pieces, and something as simple as fishing line can be used for small pieces. But you must USE SOMETHING. Hanging an unwired canvas on the wall makes for potential fall–the rhyme was unintentional, but the sentiment is true. Also, for those who wrap their own canvas, the nail may get caught in the canvas itself, potentially ripping the canvas on the back and threatening the integrity of the piece for your buyer.
UNFRAMED CANVAS

Eyelet screw/wire on inside of frame, the painting lies flush to the wall.

Mind the gap: eyelets screwed on outside of frame create a gap against the wall.
First, think of your sides. Do you want to wrap the painting around the side, or do you want a clean edge? Do you want the ‘gallery wrapped’, or the stapled sides? NOTE: Stapled sides do NOT show well unframed. This matters with some buyers.
Wiring your canvas is the simplest, cheapest, and most convenient method. Purchase a pack of eyelet screws and a roll of wire–NOT the kind that requires crimps!–screw the eyelet in the INSIDE of the wooden frame. Why the inside? Because when it’s on the outside of the wooden frame, the eyelets make the piece tilt away from the wall.
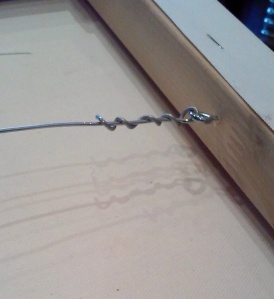
Do not put your eyelets too close to the top–I generally begin about a third of the way down. Measure your wire, and wrap the wire through the eyelet. Leave enough for a secure wrap–too little, it’s not secure, and the weight of the canvas will pull the wire loose. Too much, and your wire could potentially show OVER the painting, which is never a good look.
FRAMES
Frames are another animal completely. They are great for canvas boards, but will increase your personal investment in the work. Buyers in my area also want to choose the frame themselves, perhaps something that matches the rest of their decor. Other buyers don’t like the frame the artist chose for the work, and want the option to purchase without.
If you decide on a frame, then choose one that fits your piece’s composition. Keep in mind, the frame itself could cost more than the painting, and will raise your retail price by that much.
Putting your canvas piece into the frame:
Three options
1) have the framer do it. Done.
2) use clips. Examples below.

Doubly secure.

One screw: goes into the frame.

Fit around the stretcher bars and ‘bite’ into the wooden frame.
3) Glazing Points. I use this method–I have a glazing point driver, points, and needle nose pliers for pulling the glazing points out of the frame. This works for both canvas and when framing flat work with glass, so you’ll see me bring it up in the next post.
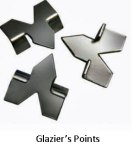


Points can be applied using the flathead screwdriver method, as seen in the second picture, when using a package of glazier’s points, seen in the first picture. Not recommended for beginners.
Glazing drivers cost around $30, and make the job effortless (once you’ve figured out the right pressure and angle for ‘shooting’). I have a glazing driver, both as an artist and as a curator, as it’s handy for both jobs.
When wiring with a frame, use the wire on the frame–the frame adds weight, and wiring on the canvas alone (unless it’s a light, thin frame) could put too much tension on the wire. I recommend ‘d rings’; just check the length of the screw with the depth of the frame–otherwise, the frame will have an unattractive “point” to make on your measuring abilities, face out to the world.

Speaking of, now you’re ready to showcase your canvas piece! Curators and buyers will appreciate your efforts, and your attention to detail.
*Ms. Wakefield notices all the details, no matter how small.

